Thursday 26 September 2013

Aphid barker - Assembly

Here's the assembly guide for Aphid loader Barker, from the wave 2 Kickstarter miniatures.

This is quite a complex miniature to assemble, definitely the most tricky we have done so far for Sedition Wars. Unfortunately, with a design like this it was always going to be that way. It all went together pretty easily though - and the only part that caused any problems was fitting the roll-cage at the end. With little thin parts like that, some bending and warping is inevitable, so it took me a little while to get the fit right. I ended up heating it slightly with a hair drier, and that made it easier to get it into the right shape - then blowing on it to cool it down so it set like that.

The parts had a little flash on them - the lower legs in particular. They are quite complex shapes to mould and that always leads to more mould lines to remove. It took me about 45 minutes to clean all the parts and get them ready for assembly. There were still little tiny bits of mould line showing here and there - but I'd consider it more than adequate for a gaming miniature. Another 15 miniatures and I would have had it really well finished. I used a clean fresh scalpel blade - two in fact - one curved and one straight edge. I also used a home made emery board (a length of brass with abrasive paper glued to it) to clean off the mould lines on the flat surfaces. It had quite a fine grit on the paper, and it actually did a really good job of smoothing down the surface without causing the plastic to tear and 'fluff'.

When the mould lines were removed, I roughed up the areas that were going to be joined with a little piece of abrasive paper to give a better key for the glue. I used Zap-a-Gap medium for gluing - it was a fresh pot, and that really made a huge difference to the speed it took the parts to grab - in fact it was just a couple of seconds for each join.

I was originally planning to pin the arms in place - but when I started assembling, I found there was quite a strong bond created with the two points of contact, so I didn't bother. I think if the miniature was going to be gamed with, and carried in cases a lot, I would be tempted though.

Here is the step by step -

All the parts as they came in the bag
Join the two halves of the body first
This is quite an important join. You need to get his back flat to the seat,
and make sure the legs are central to the 'thigh' parts of the exo-suit
so they will interface with the lower legs of the miniature.
Add the left leg, making sure the exo-parts of the leg are touching.
Add the right leg, making sure both feet sit flat on the ground.
Add the round end piece to the weapon
Add the single extra claw to the arm - then the double
 claw-piece in the slot in the middle
Add the right arm - gluing at both points of contact, the shoulder
and forearm.
Add the left arm - again, gluing at both points of contact.
The roll-cage was carefully bent into shape and glued in place.
The two shoulder pieces were added and the miniature attached to the base.

Monday 15 April 2013

Salute

This Saturday is Salute at the Excel in London. Salute is one of the highlights of our year - and while it's a crazy day, we really look forward to seeing everyone there.

We're at stand TK17, so please come along and see us if you are going.

We are going to have the entire Limited Edition line available (those which haven't sold out anyway...), copies of the Battle for Alabaster game - which we will be running demos of at the booth, and some new preview releases...

Everything we have there will be at special prices for Salute.

The first is the new miniature in the LE resin series - Ur-Fidyr


The next two are previews for Sedition Wars miniatures - these are cast in high quality resin (just like the LE series), and are available in very limited quantities. Commodore Grist and Phaedrus Chirurge.


Hope to see you there!

mike

Tuesday 5 February 2013

Female Samaritans - Assembly

There are two different female bodies included in bag 4 - one wearing a helmet and one with a bare head. The bare headed version is designed to take the las carbine, and the helmeted version is primarily designed to take the special weapons, though it will also take the las carbine perfectly well. I have found it's easy to make the guns fit any of the miniatures with just a little trimming to the right shoulder, and in some cases a tiny re-positioning of the left arm with hot water (method here).

The special weapons for these miniatures are found in bag 3, on the sprues that also contain the Reaver arm and weapon.

Each miniature comes in two pieces - the body and the weapon. Here are all the parts together - including the weapons still on the sprues.


Before I assembled any of the miniatures, I dry fitted the parts I was working with to check the fit. If there needed to be any adjustment of the left arm, I did that first and then glued the pieces. The las Carbine fitted very well on the body with bare head, and the Lancer special weapon fitted well on the helmet body.


The other weapon combinations go together in exactly the same way - here's the body with no helmet assembled as a Grenadier.


Thursday 31 January 2013

Male Samaritan - Assembly

Here are the assembly instructions for the male Samaritan trooper.

This is just a two piece miniature - body, and arm/gun -


And here is how he goes together -


It's a nice close fit between the gun and the body, so they assemble very easily.

Here's a couple of pictures of the fit between the gun and the body -


Tuesday 29 January 2013

Revenants - Assembly

There are three different variants of the Strain phase 1 Revenant, and all are very easy to assemble. Two of them only require attaching to the base, and the other just needs the two halves of the body joining.

Here are the parts of the three variants -


The two single piece miniatures just require attaching to the base -


The other Revenant just need the two halves gluing together. It's best to attach the feet to the base first - that allows you to get a good contact between the two halves of the body and the left hand which is touching the base -


Thursday 24 January 2013

Cthonian - Assembly

The miniature that has caused the most problems for assembly so far is the Grendlr - with the two parts of the body being warped so they do not fit correctly. I shot a video for how to handle that issue, and we found it worked very effectively. There is a similar issue with the Cthonian - but it's just one of the legs that has warped, causing problems with the way it fits on the base. Again, this was pretty simple to fix - I just dipped it in very hot water (being careful), and re-shaped it slightly.

I found the best way to do this was to attach the left leg first (as that fit correctly), and then correct the position of the right leg, lining it up by standing the miniature on it's feet while the leg cools.

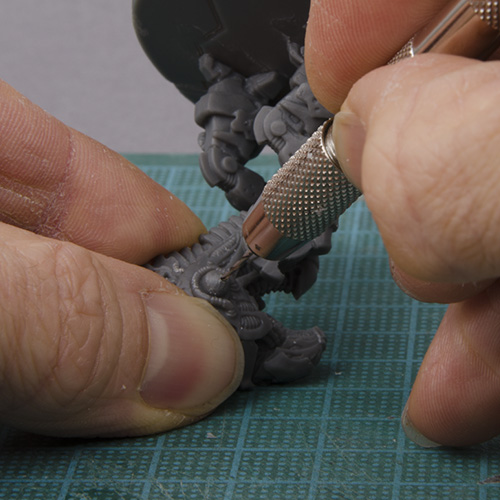
The other thing I did on this one, was to pin the arms into place - this is not strictly necessary, but where there is a large part attaching to a small area, the increased leverage make it quite likely to break off if dropped. I just drilled a hole in the end of the rounded part of the joint - glued a short length of brass wire in place (a little bit of paper clip would do just as well), and then drill a corresponding hole in the gun. The two parts are then glued together. There is one part that is optional - the face plate. If you want to add that, it just attaches to the front of the head.

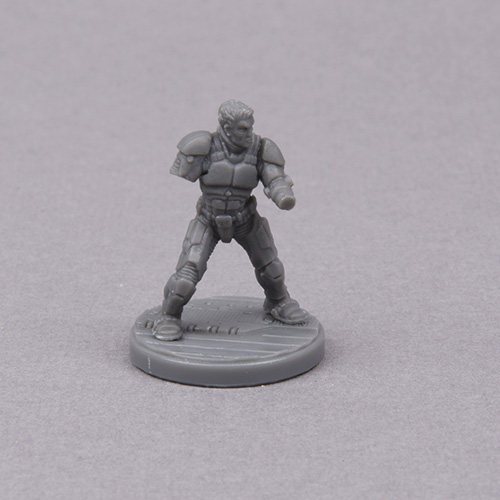
Here are the parts for the Cthonian -


Here is the fit between the right leg and the ground before it is fixed, the left leg is glued in place here -


Here is the fit after the right leg has been dipped in hot water and held against the ground while it dries, and is then glued to the base -


To pin the arms in place, I drilled a hole in the body half, then inserted a short brass pin -


Then the arm was glued in place, and I did the same for the opposite side -


Here is how the optional face-plate fits -


Wednesday 23 January 2013

Brimstone - Assembly

Here are the assembly instructions for the other Phase three Strain in the game - the Brimstone. The parts go together very easily for this one - there are definite locations for each of the limbs. I found it easiest to attach three of the limbs first - making sure the contact with the ground was level while the glue was drying. It should be fine though as the fittings are accurate. When the first three limbs were on - I glued it to the base, then added the final leg.

Here are the components -


And here is the stage by stage assembly -


BfA - Bag 4 contents

Here are the contents of bag 4 -


This one contains the following -

Five male Samaritans (complete with guns), five female Samaritans with helmet, five female Samaritans with no helmet, five phase one with claw hand, five phase one with big arm, four phase one crouched over, four phase two Quasimodo, four phase two Stalker.

The guns for the female Samaritans are found in bag 2

mike

Scythe Witch - Assembly

Here are the instructions for the Scythe Witch, one of the phase three Strain from bag 2. The only separate part on this miniature is the right arm - which glues on pretty easily at the shoulder. There is no plug and socket joint, but the parts fit accurately together in the correct position. There is one trickly little injection mark to remove on the tendril - the best way to et this is to hold the part flat against a solid surface (ideally a cutting mat, or piece of thick card), and carefully trim it away with a sharp blade.

Here are the two parts -


Here is the injection mark being removed -


And here's how the parts go together -


Reaver - Assembly

Here are the assembly instructions for the Reaver heavy weapon support trooper found in Bag 2 - there are two of these in the box game. The Reaver support weapon and the left arm, are supplied attached to a sprue - so these need to be cut off the sprue before assembly. Be careful to cut away the sprue marks on the plug-joint of the arm - to ensure it fit snugly in the socket-joint of the shoulder.

Here are the parts -


The model is simple to assemble - attach the right arms first, and then the gun. The arm fits solidly to the shoulder (it only fits one way), ensuring the gun fit is accurate.

Here are the stage by stage pictures of the build -


mike