There are three different variants of the Strain phase 1 Revenant, and all are very easy to assemble. Two of them only require attaching to the base, and the other just needs the two halves of the body joining.
Here are the parts of the three variants -
The two single piece miniatures just require attaching to the base -
The other Revenant just need the two halves gluing together. It's best to attach the feet to the base first - that allows you to get a good contact between the two halves of the body and the left hand which is touching the base -
The miniature that has caused the most problems for assembly so far is the Grendlr - with the two parts of the body being warped so they do not fit correctly. I shot a video for how to handle that issue, and we found it worked very effectively. There is a similar issue with the Cthonian - but it's just one of the legs that has warped, causing problems with the way it fits on the base. Again, this was pretty simple to fix - I just dipped it in very hot water (being careful), and re-shaped it slightly.
I found the best way to do this was to attach the left leg first (as that fit correctly), and then correct the position of the right leg, lining it up by standing the miniature on it's feet while the leg cools.
The other thing I did on this one, was to pin the arms into place - this is not strictly necessary, but where there is a large part attaching to a small area, the increased leverage make it quite likely to break off if dropped. I just drilled a hole in the end of the rounded part of the joint - glued a short length of brass wire in place (a little bit of paper clip would do just as well), and then drill a corresponding hole in the gun. The two parts are then glued together. There is one part that is optional - the face plate. If you want to add that, it just attaches to the front of the head.
Here are the parts for the Cthonian -
Here is the fit between the right leg and the ground before it is fixed, the left leg is glued in place here -
Here is the fit after the right leg has been dipped in hot water and held against the ground while it dries, and is then glued to the base -
To pin the arms in place, I drilled a hole in the body half, then inserted a short brass pin -
Then the arm was glued in place, and I did the same for the opposite side -
Here are the assembly instructions for the other Phase three Strain in the game - the Brimstone. The parts go together very easily for this one - there are definite locations for each of the limbs. I found it easiest to attach three of the limbs first - making sure the contact with the ground was level while the glue was drying. It should be fine though as the fittings are accurate. When the first three limbs were on - I glued it to the base, then added the final leg.
Five male Samaritans (complete with guns), five female Samaritans with helmet, five female Samaritans with no helmet, five phase one with claw hand, five phase one with big arm, four phase one crouched over, four phase two Quasimodo, four phase two Stalker.
The guns for the female Samaritans are found in bag 2
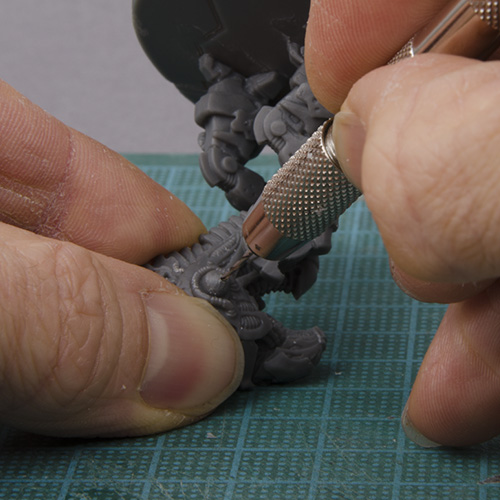
Here are the instructions for the Scythe Witch, one of the phase three Strain from bag 2. The only separate part on this miniature is the right arm - which glues on pretty easily at the shoulder. There is no plug and socket joint, but the parts fit accurately together in the correct position. There is one trickly little injection mark to remove on the tendril - the best way to et this is to hold the part flat against a solid surface (ideally a cutting mat, or piece of thick card), and carefully trim it away with a sharp blade.
Here are the assembly instructions for the Reaver heavy weapon support trooper found in Bag 2 - there are two of these in the box game. The Reaver support weapon and the left arm, are supplied attached to a sprue - so these need to be cut off the sprue before assembly. Be careful to cut away the sprue marks on the plug-joint of the arm - to ensure it fit snugly in the socket-joint of the shoulder.
Here are the parts -
The model is simple to assemble - attach the right arms first, and then the gun. The arm fits solidly to the shoulder (it only fits one way), ensuring the gun fit is accurate.
Here are the stage by stage pictures of the build -
Here's the run through for Barker. The parts go together in a very straightforward way, and the only tricky thing is deciding which weapon to give him. We only have one studio version painted, so I have inserted a pin for the Plasma thrower (it's a tight fit in the hole so stays on okay), and if I want to use the Fusion lance I pop a little piece of blu-tac in the join - it's worked fine in games so far. People have suggested using magnets to attach the weapons, and that sounds like a great idea - I must give it a try.
Here are the parts in the bag -
And here are the stage-by-stage photos for the assembly -
Here is the run-through for Hurley. This is a very straightforward one to put together, and it's pretty clear where the different parts go. The only tricky thing is the base - there is a re-enforced hole in the middle of the base for the post, and this need to be cut out.
The best thing to do here is to use a sharp craft-knife blade and twist if through from the back of the base. Once the point is through - flip the base over and cut from the top surface. Please take care when you are doing this - always cut away from your fingers and work on a cutting mat if possible.
Here are the components for the miniature. There are four pieces plus the base - main hull, turret, aerial and post.
Here are the stage by stage photos of the assembly -
I thought I would skip ahead a little on the assembly and have a look at The Grendlr, as some questions have been raised about the fit between the pieces. After a quick dry fit of the parts (just holding them together to see how they look) - it became very obvious that the fit between the two body halves and the mouth piece is pretty poor. I'm not entirely sure what has caused this - the samples I received earlier in the production process were far better. I can only assume that there was either some warping when the parts are removed from the mould - or they have been subject to differences in temperature during shipping (the games are transported in containers that have no temperature control). Either way, I have to be honest and say I'm disappointed, and apologise if that's the way you feel when seeing the miniature.
However... I have just spent the last hour putting the Grendlr together (and that was cleaning the mould lines, shooting a short video and assembling the whole thing, while taking pictures along the way), and I'm far happier now. There is a very simple technique that can be used to get a very accurate fit between the parts - it takes no practice, and the results are really, really good. I have never done this before, so I'm as new to it as you are. We shot a short video of the process - apologies for the quality, but hopefully you can see what I'm doing. We'll try and find the time to shoot a better one soon.
All you have to do, is put the parts you are assembling in very hot water for around 20 seconds (I heated water in a kettle, and turned it off just before boiling) - and while they are still hot, firmly press them together. I was really pretty astounded at how well this works - I did it with the two body halves, and the fit was great. I then glued the body together, and did the same with the mouth-piece - I put it in hot water (not the glued body though), and pressed it onto the body.
You obviously have to be careful with the water - I used a pair of pliers to remove the pieces from the bowl, but when I handled them (pretty much immediately), they were only warm. Nowhere near hot enough to burn you.
All of the other parts fitted very well - the exception being the head, which needed the location lugs trimming to get an accurate fit. I presume this is because the body parts have changed shape very slightly with the technique above.
Overall I am really happy with the Grendlr - I started this morning a little depressed about how poorly the body pieces fitted, but I now have the assembled miniature in front of me, and it looks fantastic. In all honesty I'd take this over a metal version any day of the week, and it's not far behind the resin castings.
Here's the stage-by-stage -
The fist thing to do was to clean the injection marks and mould lines from the parts. The mould lines were actually very light on this miniature, so that was a quick process. Just make sure you have a brand new blade in your craft knife - it makes it far easier and the results better.
The next step was to fit the two body halves together - and as mentioned above, I improved the fit dramatically with the hot water technique, so much that there was no gap at all along the spine and across the belly. There was still a slight gap where the mouth was going to fit, but I knew that was going to be completely covered.
The next part to fit was the mouth piece - and this was the only other part that I did the hot-water method on. I also removed the fitting lugs between the body and mouth part, as this made it easier to get a good fit. They were very simple to cut away with a sharp blade.
Next was the head - and again, I cut away the fitting lugs on the back to give a more accurate fit with the body.
Once the head was in place, it was simply a case of gluing the rest of the parts in place, one by one. There are fitting lugs for the legs and arms and they ensure you get a good fit between the Grendlr and it's base - so all three limbs contact the ground solidly. Here are the photos of the rest of the parts going on -
And here are a couple of different views of the finished piece. I know it's just a little more work than is ideal, but I think that is more than offset by the miniature itself - I really think it looks fantastic. It was always ambitious to put such a large piece in the game, but I'm really glad we did.
This is the Blog for Studio McVey - Mike and Ali McVey. We'll be using this blog to give updates about our miniature ranges, and show what we have been up to in the painting and sculpting studio. Please subscribe to keep up with the latest news.