Thursday, 13 December 2007

Boobs is what they want!

I get quite a few people asking how I paint skin, so for this latest Hasslefree paintjob I thought I would try to photograph the stages and write a little commentary to go with the pictures. With every piece I paint, the colours I use are always slightly different depending what the miniature is. One piece of advice I'd give to anyone painting skin would be not to start too dark and leave yourself too far to come up with the highlights. Also, keep the shadows cool and the highlights warm and you won't go far wrong. I use mainly Wargames Foundry paints. I find they have a superb choice of flesh tones in their range.


1) Base coat with a mix of Butter Fudge and Dusky Flesh


2) Multiple thin coats are better than one thick coat. In fact
this is the trick to keeping the surface silky smooth. Be sure to let each dry thoroughly before applying the next


3) It is important to get a nice even base colour before beginning to shade and highlight


4) Mixing a shade colour by adding a drab to the base mix. I generally use colder tones for shading flesh and usually mix this by adding a blue or a green to the base mix


5) I apply shading to the miniature as if it is lit from above. While working under your regular painting lamp it's easy to place the mini down on your desk and see where the light would hit. I keep the shading quite subtle as it is much easier to add more shade colour if it is not quite dark enough


6)In this case I felt the shading needed to be a little darker so I added a darker blue/grey to the mix


7)It may be difficult to see in this pic, but I have darkened the shaded areas a little more


8)Here I have started applying highlights with the original base colour with more Butter Fudge added


9)I progressively lighten the highlights by first adding more Butter Fudge, and then Bone and White - using gradually lighter tones building the highlight in layers. I use the paint quite thin, ensuring each layer has dried before applying the next. I do use the two brush method to blend the highlights. First laying down paint with one brush and then bleeding the hard edge with a clean damp brush


10) Continuing to lighten gradually using thin layers of paint.


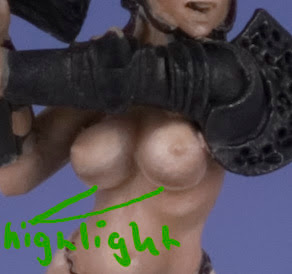
11) This highlight just under the boob (reflected light from the tummy) is key to making them look nice and round


12) Final highlights


13) A dusky flesh for the nipples and for the lips and the skin is almost finished. At this point I spend a little more time bringing out the facial features but I will save that for another step by step


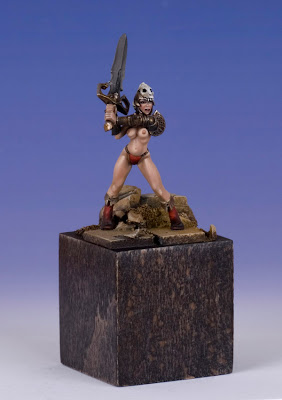
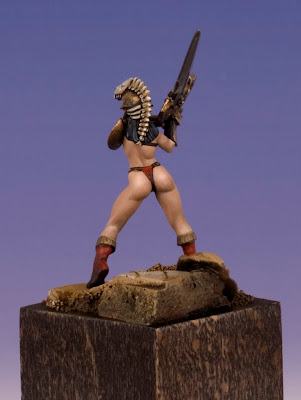
The finished piece which is also now up for auction on Ebay!

Hope this is helpful

Ali

Thursday, 18 October 2007

Ravage Open Mix

Last weekend was the Ravage Open Mix painting competition at Salon du Jeu in Paris - what a fantastic event! Ali and I (and our little son, Cal of course) went over for the weekend and I have to say that we really enjoyed ourselves. The show itself was pretty small, but the painting competition had without doubt the best quality miniatures I have ever seen - really outstanding. I'm not sure how many people entered, but the cabinets were just packed with beautifully painted miniatures - I just didn't know where to look, one fantastically painted miniature after another...

Ali and I painted some miniatures specifically for the event - not really with any thought to winning, but more to show our support than anything else. It's just great to have a competition of this caliber that isn't affiliated with a specific company - that has to be good for the hobby and we both wanted to participate on those grounds alone. We have updated the main site with pictures of the miniatures we took along - just check our galleries to see the photos. Ravage Open Mix is an open format competition, where each miniature is judged on it's own merits, rather than against the other pieces. So if the judges think it's worth a gold (or silver, or bronze), it's awarded one no matter how many others are painted to the same standard. This creates a friendly event where the emphasis seems to be on sharing and encouragement rather than out and out competition. This is the way that practically all Military modelling events are run, and in fact there were quite a few historical pieces there in amongst the fantasy and sci-fi.

The competition was great, but the best thing was getting to meet and talk to all the other painters - and I just wish we had more time to do that. It was great to meet Jeremie Bonamant and Allan Carrasco, and Ali and I did a painting demo at the Alkemy stand - the miniatures are great and I think the game is going to be a big hit - I believe it's going to be in the stores in January, but check the website for details.

I also got to chat quite a bit with Jacques-Alexandre Gillios and Thomas David, who are without doubt two of the best sculptors in the business right now - they are currently working on the Hell Dorado range, which I think it just stunning... In fact there are a few Hell Dorado miniatures on my painting desk waiting patiently for some attention. Both are also amazing painters, in fact Thomas walked away with Best In Show - which after having seen his Autarque Eldar in real life, he absolutely deserved. I can't tell you just how much better it actually looks than the photographs - it really summarized everything that I love about miniatures. Just stunning. The amazing thing is though - there was plenty of other miniatures there that were really just about as good!

We also got to meet Cyril Abati, Julian Casses and Mathieu Lalain (amongst many others!) - and seeing their work was a real treat. As is almost always the case with great painters, photography can never do justice to the quality of their work - it's just amazing in real life.

I took along several of my old GW miniatures from the mid and early nineties - and they got a great reception! Lots of people were showing me old copies of White Dwarf magazine and the painting guide series I wrote from the same period, so it was quite a nostalgic trip in many ways.

We'll definitely be going back again next year - I really think this competition has the potential to take off in a big way. There is talk that some of the Spanish Team are going to be making an appearance next year - so that can only make it better. Ali and I both managed to walk away with Gold awards in the Masters Painting category (which we were very pleased about), so we'll have to make sure we have some exciting things to take along for the next one.

The next painting event that we are definitely planning to go to at the moment is World Expo in Spain next July. I have been invited along to be one of the guest Judges, and we're really looking forward to it. I'll be talking more about that in the next few months - it's shaping up to be a great show.

Talk to you soon

mike

I took quite a few photos, but not very many good ones. You couldn't really get close enough to the cabinets to take photos of the miniatures - there were just too many people crowding round them. I've added a few below, but there are many more over at Jeremie Bonamant's website.

It was hard to get anywhere near the cabinets, there were constantly so many people crowded round trying to get a look at the entries


By the time all the entries were in, there was very little spare shelf space - and the quality was great throughout.


My miniatures in amongst all the others. The strong saturated colours of the older GW minis stood out pretty well!


Allan Carrasco's amazing Daemonette that took the Slayer Sword at this years french Golden Demon. Next to it is another Daemonette sculpt.


David Waeselynck's Duel from this years UK Golden Demon - definitely one of my favourite pieces from the show. The larger scale bust next to it was also his.


There were lots of miniatures there I had never seen before, several of which were busts. I don't know if these are one-off sculpts or I just haven't come across them before - great work though.


The Alkemy stand was one of the busiest for the whole show. They were running demos of the game all weekend and there were regular painting and sculpting demonstrations.


Jacqes-Alexandre Gillios giving a sculpting demo at the Alkemy booth.


Cal found the whole event pretty exciting!

Sunday, 7 October 2007

Different Strokes

We had the pleasure of having Sebastian Archer (Automaton on cmon) stay with us last weekend - which gave us the opportunity to see his miniatures collection up close. I have always been an admirer of his work, ever since he appeared on the scene a couple of years ago - and seeing the miniatures in real life just confirmed that. As is often the case with really good miniatures - photography just doesn't capture the painting with any integrity. It's not until you get to hold them in your hand, that you get to see how good the really are. Sebastian's work is a classic example of this - it looks great in photographs, but truly stunning in real life, in fact it's hard to tell you just how good they are. Just wait until you see the work he did for this years GD UK and the Ravage Open Mix...

While he was here I dug out some of my old work from GW to show him - all of it 12 years + old and some done over 15 years ago. When we'd been talking about the work for a couple of hours, I looked down at my desk and all the miniatures were sitting there next to each other - his work right next to my work. The difference in styles was just astounding - I really wish I'd taken a picture of it... Granted, most of the work I had there was from a different era in miniatures - but even so, it really made me think about different styles of painting. When I came back to miniature painting a few years ago (and by that I mean when I actually started to paint again after an 8+ year hiatus), the hobby had progressed enormously, and painting was going in a totally different direction from when I left it. At first I thought - "I've got to learn to paint like these guys!", but more recently I have realised that would be a mistake. The more I think about it, the more I realise that style is just not me - so why try and force it? One of the things I enjoy the most about this hobby, is that many different ways of painting can co-exist along side each other - no one more valid than another. My approach, and reason for painting, differs fundamentally from some of the new painters. I have always striven to produce precious objects - gem like miniatures that had vibrant deep colours that owed more in foundation to to works of John Blanche, than the gritty realistic subjects many modern miniature painters take their cues from. I still feel the same way now - these are fantasy miniatures and I like to treat them as such - 'realism' has never been high on my agenda. That is in no way meant to denigrate the work of people like Sebastian, and I am constantly in awe of what they produce - I just think it's great there is that variety, and divergence of approach in the same field.

This weekend is the Ravage Open Mix in Paris, and I am really looking forward to seeing some of the work that will be there. Sebastian will be there, as will many of the great French painters - I believe Jeremie Bonamant, Allan C, Jacques-Alexandre Gillios, Julian Casses, Mathieu L, Cyril Abati and David Waeselynck are all going to be there. I just can't wait to be able to see their work close up. Ali and I both have new pieces to take along, and I think I am going to take some older stuff also - they been away in a case for a while, so it's about time they had an airing.

We plan on taking lots of pictures and adding a full report here when we get back - it promises to be a great weekend!

mike

Here is a little comparison between Sebastian's and my work (both of mine are over 12 years old I hasten to add!). Apologies to Sebastian for stealing the images off his website - but like I said, I forgot to take a comparison picture while he was here.

Enjoy!

Sunday, 30 September 2007

Gallery Update

LinkBack from holiday and back in the studio!

We have just added a few more images to the main site (www.studiomcvey.com). A couple of commission pieces that Ali painted last year and a real blast from the past from me - the first Eldar Aspect Warriors ever painted! I have images of the miniatures I painted for the GW studio back in 1990 - these come courtesy of Jes Goodwin who now owns the figures, and kindly let them be photographed for the site. I remember painting them really clearly, they were really quite a step forward in miniatures at the time, and a joy to paint. Little did I realise at that time that nine years later I would be sculpting updated versions of some of them myself.

Alison and I have quite a few things in the pipeline, and a really busy couple of weeks before we travel over to Paris for Salon du Jeu and the Ravage Open Mix. That's promises to be a really great event and we can't wait to see everyone who's going. I will be doing a painting demo on the Alkemy stand on Saturday afternoon, so stop by and check out their great miniatures - it promises to be a fantastic range.

If you can't see the new images in the gallery sections - try clearing the cache in your browser and refreshing the page.

Talk to you soon!

mike

Thursday, 27 September 2007

A Little Experiment!!

Back to the grindstone after our holiday so I thought I'd ease myself back into painting by having an hour or two experimenting. Recently a friend asked us to pick him up some masking fluid so we thought we'd get some ourselves. I use it quite a lot in my illustration work and I have always wanted to try it out on miniatures so I finally got round to giving it a go. I have seen it used to great effect by military modellers and I recently read an article by the very talented Cyril Abati who, like some military modellers uses it for weathering purposes more than anything else. I have always thought that maybe I could use it to produce some interesting freehand decorative effects maybe masking of areas and layering the freehand.
I figured it would work best on a nice large open area so a half painted steamjack in our miniatures case was perfect.


I applied the masking fluid with a brush. As with all types of masking fluid you have to be reasonably quick painting your design because as the masking fluid dries your brush sometimes sticks as you try to apply more and pulls what you have already painted on - right off!!
I chose to paint some simple lettering. Painting the letters with the masking fluid and then washing over the panel with another colour means that once the masking fluid is removed, the base colour of the steamjack will be left in the shape of each letter.


fig 1 - applying the fluid with a brush


fig 2 - washing over the dry masking fluid with a darker shade


fig 3 - masking fluid is removed by rubbing gently with a clean finger - or a clean eraser may be better


I then blocked out the shape of a star with the fluid so once removed the image of the letters would show through.

fig 4 - star shape painted in masking fluid


fig 5 - A bone colour is blocked in over the star shape

fig 6 - Bone shade is highlighted as normal


fig 7 - Masking fluid is removed leaving the lettering design visible underneath

The results were interesting and by no means perfect as this was just an experiment. To be honest, creating a perfect design in masking fluid would be a lot more difficult and time consuming than just painting the design straight on with paint. The gluey properties of the fluid make drawing a perfectly sharp design a little tricky. It may have it's uses though. It would be great for masking off large areas and simple shapes and I'm really keen to try it for weathering effects.

Ali

Sunday, 16 September 2007

Quick update

Ali and I just wanted to get a couple of quick posts in before we leave on holiday tomorrow - we're going to be away from the studio for a week and didn't want to leave it that long before checking in again. First of all I would just like to thank everyone for the great response to the site and blog - we have had so many great emails! We really appreciate it

This is going to be a pretty brief post from me - partly because we're trying to get everything tied up today before we leave, and partly because I can't really show a lot of the things on my desk that I've been working on. Here's a quick shot of something that I can show though - it's a scenic base for a miniature I am working on for a friend (the amazingly talented Jérémie Bonamant). It shows pretty well one of our favourite basing materials - plaster. It's just so easy to get natural rocky shapes with plaster - it carves very easily to the shape you want and even though it's very friable, it can be hardened with an application of thin super-glue to the surface. I'm not sure how hard wearing it would be for gaming miniatures, but for display pieces, it's fine. Hydro-stone is far harder wearing, but is tougher to carve. I find it's best to get the basic shape right before it sets completely and then work on the texture once it's dry. With plaster you can do all the shaping and texturing once it's totally dry.

We make basic slab shapes from the plaster by pouring it in to blister packs (they are really convenient for this as they are totally water-tight), filling to different depths. We'll do a batch of different sizes and thicknesses at one time. Once it's all dry, you just turn it out of the blister and break it up into chunks with two pairs of pliers. I stick chunks together with super-glue to get the basic shapes, then carve into them to give a natural finish. You do have to 'seal' the surface before the glue will stick them though - just carefully coat the surface with glue (at the point you want to attach another piece) and let it soak in and dry. Then re-apply glue to stick the pieces together.

The sand on this base was also stuck into place with super-glue, there were two reasons for this. The first is that it tends to form onto 'clumps' more than if you use PVA (which I like), the other is that I wanted to re-enforce the join between the scenic detail and the display plinth.

I'll post again on this subject once the base is painted, and the figure is added.

That's it for this post - I'll make sure I get something new up as soon as we get back from holiday!

mike

Thursday, 6 September 2007

Welcome the Studio McVey Blog!

We are launching this blog at the same time as the Studio McVey website, and one of the main reason for the blog is so we can create articles for the miniatures we feature on the main site - and to give you a chance to see what we are up to in Studio McVey !

The main website can be found at www.studiomcvey.com, or just click on the link to the website on the right of this page. If you subscribe to this blog, you will automatically know when there is something new to look at here, or at Studiomcvey.com.

There are two brand new painted miniatures on studiomcvey.com right now - a fantastic version of Tiriel that Ali painted recently, and a Deathjack that we have been working on between us for the last year or so. We actually find it really easy and enjoyable to work together on projects - one of us will do one part of the miniature, then hand it off for the other to work on something else.

One of the things that I really enjoyed work on for this piece is the base. The thought behind this piece was that this Deathjack was being transported on a ship, but the vessel was destroyed and sank during the voyage. The 'jack had to head for land across the ocean floor, and this miniature is supposed to represent it after has emerged from the ocean. The armour is pitted and rusty, and the surface is covered with barnacles and dripping with slime. I wanted the base to look like the 'jack is still on the beach, lurching across rocks and driftwood. The photographs on this page show a couple of the key stages in the construction - it was pretty easy to make. The rocks are just made from different sized balls of greenstuff - placed onto the base and then shaped and flattened slightly. The planking is just strips of balsa cut to size and glued together. When the rocks and pebbles were dry I added the fine details - like the barnacles and star-fish.

To make the curved shape of the wrecked boat hull, I cut some balsa strips and soaked them in water for a while until they became pliable. I bent the strips round a glass jar and held them in place with a few powerful rubber bands. When the wood dries it retains the shape is was forced into. I cut these curved pieces to length, and fastened them together with some cross-bracing, then glued the whole section onto the base. As the Deathjack is huge, I wanted to counterbalance that a little by have the planking overlapping the sides of the base a little . At this point I also added the holes for the 'jack's foot pegs. I cut the holes with a sharp blade and then packed out underneath them with greenstuff to give something solid to glue the miniature to.


Once the construction on the base was finished, I sprayed the whole thing with black primer and painted it. I started on the rocks first - building up the highlights and texture with light application of a sponge. I used a few different colours for the rocks, but mainly a pale grey/blue and faded red/pink as these seem to be common beach pebble colours. When I was happy with the highlighting I added in some faint white lines to represent veins of minerals running through the rounded rocks. I painted the barnacles a pale sandy colour and added a little green round them to make them look a little more natural.

That's it - finished!


Both Ali and I are really busy working on miniatures projects at the moment, but we are going to try and update this blog and studiomcvey.com as often as possible. We'll be publishing mini articles like the one in this entry, but we'll also be sharing our thoughts about miniatures and whatever is catch our attention in the hobby. So click the subscribe link on this page, and then you'll know when there is something new to look at here.

Talk to you soon!

mike

PS - Huge thanks to Aaron Hedquist for designing and building the Studio McVey site - we think it looks fantastic!